Related Posts Plugin for WordPress, Blogger...
Showing posts with label main course. Show all posts

Shrimp in Light Dill Sauce

This was inspired by my Father’s recipe. It brings back so many warm and loving memories. Sunday lunch was always served around 2pm, when we lived in Jamaica, in the 1970’s. One of the lunches that always come to mind is with my Mum, Dad, Grandma and my sister. My Dad would prepare a large bowl of his “Shrimp in Dill Sauce” which was served in my Mother’s large green and white Rosenthal China bowl. His dill sauce was thick and creamy, more along the texture and consistency of a béchamel sauce. Huge succulent pieces of shrimp were added to finish the dish. Hmmm…Sunday lunches were my absolute favorite. This is a lighter version of my childhood favorite.
Photography by Heaven On Hearth

1 pound shrimp
¼ medium onion, diced
1 clove garlic, roughly chopped
2 dill stalks, finely chopped (2 tablespoons)
⅓ cup heavy cream
2 tablespoons canola oil
¼ teaspoon salt
3 tablespoons butter

For the simple shrimp stock:
shrimp shells (approximately 3 ounces)
pinch of salt
pinch of red pepper flakes
1 tablespoon canola oil
1 cup water

Start by dicing ¼ medium onion and roughly chop 1 clove of garlic.
Shrimp Shells, Onions and Garlic
Using 2 bowls, de-shell and de-vein 1 pound of shrimp. Place the shells in one bowl and the shrimp in another. The shrimp shells will be used to make the stock. Cover the bowl with the shrimp and keep in the fridge until ready.
Shrimp Stock Simmering
Heat a large skillet over medium high heat. Once the skillet is nice and hot, add 1 tablespoon canola oil then toss in the shells, a pinch of salt and a pinch of red pepper flakes. Sauté the shells for 5 minutes before adding 1 cup of water and continue to simmer for 5 minutes. Once the liquid has reduced, strain the stock through a sieve and discard the shells. This will yield ¼ cup of stock.
Shrimp Stock
Using the same skillet, over medium heat, add 2 tablespoons canola oil. Toss in shrimp and sauté for 2½ minutes, or until the shrimp are slightly pink on each side. While the shrimp are getting pink, chop 2 stalks of dill, or enough for 2 tablespoons. Then, add the diced onions, garlic and 2 tablespoons chopped dill and sauté for another 2 minutes.
Shrimp with Onions, Garlic and Dill
Add shrimp stock, ⅓ cup heavy cream and ¼ teaspoon salt and simmer for 2 minutes. Just before taking off the heat, add 3 tablespoons cold butter to thicken the sauce.
Shrimp in Light Dill Sauce
This serves 4. Voilà. Serve with fluffy white rice, vegetables and a tossed salad. It makes for a perfect dinner. A chilled glass of Grüner Veltliner would certainly compliment this dish.

Read more...

Quiche Lorraine

This is such a wonderful way to start off the perfect weekend breakfast. A flaky crust filled with a creamy, cheesy custard filling with bacon bits, a glass of orange juice and fresh fruit on the side with a steaming cup of coffee. What a delicious way to start your morning.
Photography by Robert Demetrius

You will need:
Pâte Brisée or one store bought ready-to-bake rolled pie crust
4 slices thick cut smoked bacon, cut in ¼ inch slices (8 ounces)
⅛ teaspoon nutmeg
¼ teaspoon salt
⅛ teaspoon pepper
1 cup grated Gruyère
2 eggs + 2 yolks
1 cup whole milk
½ cup heavy cream

If using the Pâte Brisée recipe, just use half the ingredients, as you will only need one crust.  Once you have made the dough and it has been in the fridge for an hour, remove and allow to rest at room temperature for about 5 – 10 minutes. This will allow the dough to soften a bit and it will be easier to roll.
Dough Ready to be Rolled
Pre-heat the oven to 400° Fahrenheit. While the oven is warming up, unwrap the dough and place on a lightly floured surface and also dust the top of the dough with flour. 
Rolling Out Dough
Roll out the dough, starting from the center to a 12inch circle. The dough should be around ⅛ inch thick.
Rolled Dough Ready to be Placed in the Dish
Gently Rolling Pastry on Rolling Pin
Lightly butter a 9inch pie dish, then gently roll the pastry on the rolling pin before unrolling over the baking dish. Press the dough gently into the dish as well as around the edges. 
Pressing Dough onto Dish
Cut the excess dough from the edges. Make sure the edge of the dish is well covered with dough, because it may shrink a bit during baking. If you have any tears in the pastry, use some of the excess dough to patch them together.
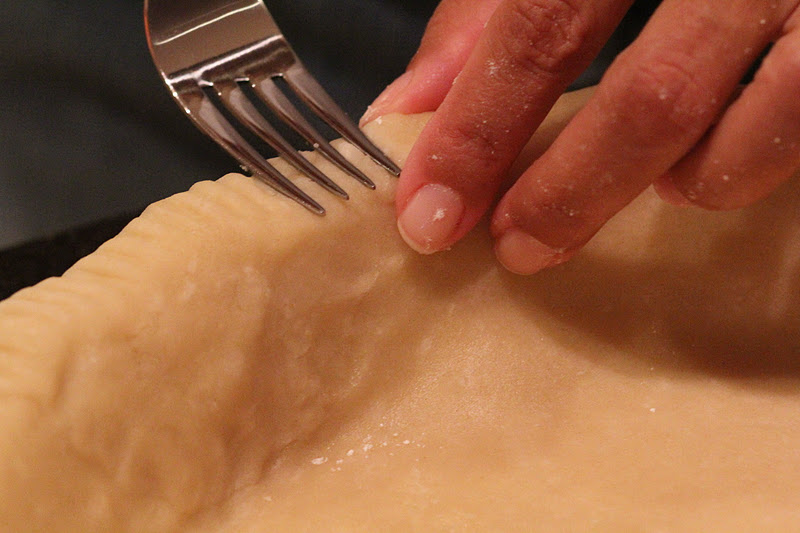
Flattening Pastry with Fork
Using a fork, lightly prick a few holes in pastry. This will prevent the crust from rising and bubbling up when baking. This has happened to me in the past, even though I used weights while baking. Then, using the tines of the same fork, flatten the pastry evenly on the rim of the dish.
Pastry Flatten on the Rim
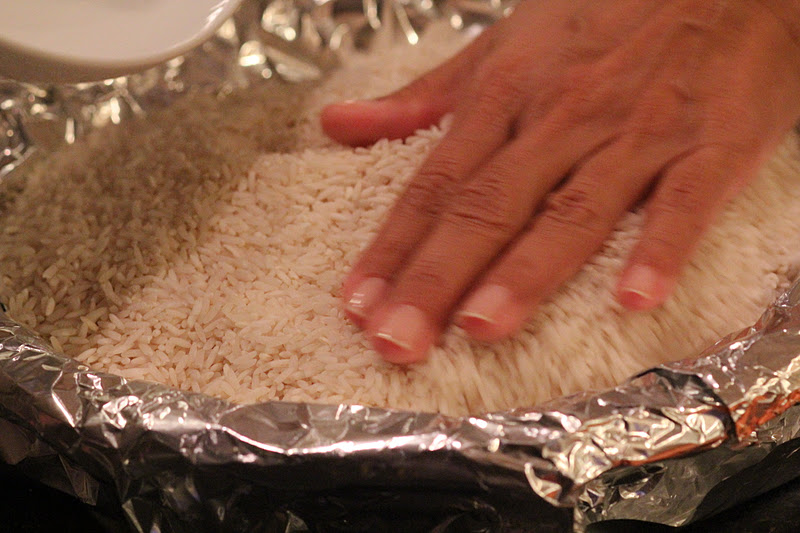
Cover the pastry with aluminum foil and weight with beans, rice or with weights. I usually use rice. 
Covering Pastry with Aluminum Foil, Weighted with Rice
Bake the crust for 18 minutes. Once baked, remove the weights and aluminum foil in one swoop, by just lifting the aluminum foil, by the edges with the weights. Place the dish back in the oven to allow the crust to dry out a bit and get golden brown for another 10 minutes. Remove from the oven and allow to cool on a cooling rack.
Baked Crust
Once the crust has cooled, heat a skillet over medium high heat. 
Bacon cut in 1/4 inch slices
Cut 4 slices thick cut smoked bacon in ¼ inch slices. Toss the bacon slices in the heated skillet and allow the fat to render and the bacon gets crispy. This can take 4 – 5 minutes. When crispy, remove from skillet and place on paper towel lined plate to absorb any excess fat.
Bacon Bits 
Pre-heat the oven to 350° Fahrenheit.
Grated Gruyere
Grate 1 cup Gruyère.

Eggs, Egg Yolk, Salt, Pepper, Nutmeg, Whole Milk and Heavy Cream
In a large bowl, whisk together 2 whole eggs and 2 yolks, ⅛ teaspoon nutmeg, ¼ teaspoon salt, ⅛ teaspoon pepper, 1 cup whole milk and ½ cup heavy cream.
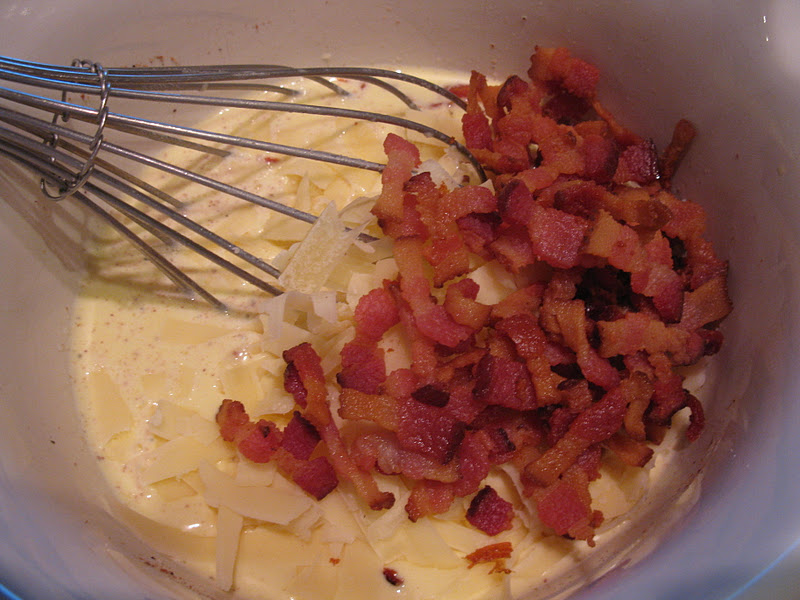
Adding to Egg Mixture, Cheese and Bacon Bits
I then add the cheese and the bacon bits and mix together before pouring into the cooled crust.
Covering Edges with Aluminum Foil
Cover the edges of the crust with aluminum foil. Bake the quiche for about 25 minutes before removing the foil from the edges and bake for 5 more minutes before taking the quiche out of the oven.

To test the quiche, stick a knife or a bamboo stick in the middle and if it comes out dry, then it’s done. If it still jiggles a little bit, don’t worry. It will set by the time it is cooled. Let cool and serve at room temperature.

A Slice of Quiche Lorraine with Baby Greens Tossed with Vinaigrette
This serves 6. Voilà. A slice of quiche with baby greens tossed with vinaigrette and a glass of sauvignon blanc can also be served as light lunch or supper.  Enjoy!

Read more...

Salmon with Garam Masala Baked in Parchment

With all different types of spices available on the market, it’s so easy to experiment.
Indian spices in particular tend to have everything you need to tickle your tastebuds. They like to blend a handful of spices that are fragrant, pungent, warm, spicy and sweet into a beautiful blend of flavors.

Garam Masala is an Indian mix of spices, made of ground coriander, black pepper, cardamom, cinnamon, charmushka, caraway, cloves, ginger and nutmeg, that compliment the salmon perfectly without being too overpowering.
Photography by Robert Demetrius

You will need:

2 feet parchment paper
1½ pounds of salmon
½ teaspoon salt
1 teaspoon Garam masala, Punjabi style

Pre-heat oven at 500°Fahrenheit
Salmon Filet on Parchment Paper
Spread 2 feet of parchment paper on a flat surface, place the salmon filet in the middle of the sheet. 

Salmon Filet Seasoned with Salt and Punjabi Style Garam Masala
Season the filet, with ¼ teaspoon salt and ½ teaspoon Punjabi style Garam masala on each side.
Seasoned Salmon Filet Folded in Parchment Paper
Once seasoned, fold the paper lengthwise first, by folding about 1 inch wide, until you have reached about 1 inch away from the filet, then fold the sides then fold under the filet.

Place the salmon, folded in parchment paper on a baking sheet lined with aluminum foil. Bake at for 10 minutes.
Ready to be Served!
This serves 4. Voilà. This dish goes well with Melted Leeks with Cream and Potatoes with Bonne Herbes Parisienne.

Read more...

Turkey Tenderloin and Asparagus Skillet

After a weekend of indulgencies a light, healthy and flavorful dish was just what I needed. I rather like turkey tenderloin. It’s that long tender strip of meat hidden under the breast.
The meat in this dish remains moist and the full flavor of the dried savory leaves, offer a peppery, thyme and mint flavor that goes well with the turkey, asparagus and mushrooms. The sauce is flavorful and light while the asparagus still have a nice bite. This is a fresh clean dish.
Photography by Heaven on Hearth

1¼ pound of turkey tenderloin
2 tablespoons olive oil
¼ teaspoon crushed red pepper flakes
1 teaspoon salt
1/8 teaspoon black pepper
1 teaspoon dried savory
½ pound asparagus cut in 1inch pieces
4 ounces mushrooms, sliced
1 medium sweet onion, roughly diced
1 large garlic clove, chopped
3 stalks scallion, roughly sliced
1/3 cup of chicken broth
Turkey Tenderloin, Salt, Pepper, Savory Leaves and Red Pepper Flakes
Cut the tenderloin in 1 inch pieces, then season with 1 teaspoon salt
1/8 teaspoon black pepper, 1 teaspoon dried savory and ¼ teaspoon crushed red pepper flakes. 
Seasoned Turkey Tenderloin
Drizzle with 1 tablespoon of olive oil and mix well so that the turkey tenderloin pieces are evenly seasoned with the spices and covered with olive oil. Set aside, while preparing the other vegetables. The turkey tenderloin can be seasoned in advance and left covered and refrigerated until needed.
If you have chosen to season the turkey a few hours before, please do not forget to take the meat out of the fridge about 30 – 45 minutes before cooking.

Because this is a fairly quick dish, prepare the vegetables beforehand so all you need to do is toss them in the pan when ready. Dice and slice the vegetables in chunky pieces. The texture of the dish will be so much nicer when you have a few vegetable chunks to bite into. Dice 1 medium sweet onion, slice 4 ounces mushrooms and 3 stalks scallion. Cut ½ pound asparagus in 1inch pieces and roughly chop 1 large garlic clove.
Turkey Tenderloin Caramelizing
Use a large skillet, as it will be easier to toss everything together. Heat the skillet on medium low heat. Once well heated, add 1 tablespoon of olive oil, then add the seasoned tenderloin pieces. Sauté the turkey for 2½ minutes before adding onions and garlic and continue tossing for another 4 minutes until the turkey starts caramelizing and gets that beautiful brown color. 
Turkey with Onions and Asparagus
Add asparagus pieces and toss for another 2½ minutes. Then add mushroom slices, scallion and 1/3 cup of broth and allow to simmer for 4 minutes.
Turkey Tenderloin and Asparagus Skillet 
This serves 4. Voilà. The dish is now ready and can be served with rice, mashed potatoes, steamed vegetables or even mashed cauliflower. A crisp glass of sauvignon blanc would compliment the dish as well.

Read more...

Meat Sauce

Here is another child friendly dish that I made for my friend. I used canned diced tomatoes, leaving the tomatoes in large chunks instead of chopping them up. I quite like biting into the chunks of tomatoes. It also adds more texture to the meat sauce and her children didn’t mind it at all!

Photography by Heaven on Hearth

The adults also enjoyed the meat sauce. It’s easy to make, versatile and this recipe is enough for 2 meals.  Meat sauce can be served with spaghetti or topped with mashed potatoes and cheese, then baked in the oven. My Mum loves to eat meat sauce with white rice and a tossed salad. It is also great in a toasted hoagie roll or on a toasted hamburger bun, similar to a Sloppy Joe. Meat sauce stuffed in a baked potato with some freshly diced red onions, cheese, jalapenos and freshly chopped parsley...how versatile is that? And the list can go on…

1 1/3 pounds of ground beef (75/25)
½ cup carrots, finely diced
1 stalk celery, finely diced
½ a large sweet onion, finely diced
2 cloves garlic, finely chopped
2 tablespoons olive oil
3 teaspoons salt
¼ teaspoon ground black pepper
1 teaspoon sugar
1½ teaspoons dried basil leaves
1½ teaspoons dried oregano leaves
28 ounces canned diced tomatoes with juice
6 ounces tomato paste
¾ cup of beef broth
Diced Onions, Celery and Carrots
Finely dice ½ cup of carrots, 1 stalk celery, ½ a large sweet onion and 2 cloves garlic finely chopped and set aside. Heat a large skillet over medium high heat. Once the skillet is hot, add 2 tablespoons olive oil and then the ground beef. Make sure the ground beef is spread out evenly in the pan, while breaking up the meat. Brown the meat for 3 minutes, then add the finely diced vegetables, season with 3 teaspoons salt, ¼ teaspoon ground black pepper, 1 teaspoon sugar, 1½ teaspoons dried basil leaves and 1½ teaspoons dried oregano leaves. 
Browned Ground Beef with Vegetables
Then add 28 ounces canned diced tomatoes with juice, 6 ounces tomato paste and ¾ cup of beef broth and stir occasionally. Allow the meat sauce to simmer for 27 minutes over medium high heat until the sauce thickens.
Meat Sauce
Yields 6 cups of sauce. Voilà. Enjoy!

Read more...

Chicken Bake for Children

A friend of mine had injured her finger some weeks ago and wasn’t able to prepare any food for her family without suffering pain, so a group of friends offered to help her out for a few days. With the kids at school, she had a chance to relax a bit, but needed help with dinner, so I offered to help her out for two meals.

With no kids of my own, I was truly unsure what to make. I have heard that children have quite a few dislikes and can be quite finicky at times, so I really wanted to prepare something that the whole family would enjoy. From past experience, with other friends that have kids, macaroni and cheese or chicken nuggets always seem to be a hit, so a chicken bake should do the trick.
Photography by Heaven on Hearth

Not wanting to the kids to be turned off by too many spices, but also having the parents enjoy a nice meal, I came up with my plan: chicken thighs, pasta, creamy sauce and cheese. Children must love it! So I rolled up my sleeves and got to work.


I used a six cheese Italian blend that has Mozzarella, Provolone, Parmesan, Asiago, Fontina and Romano Cheeses. It wasn’t too harsh in flavor that the kids wouldn’t enjoy it.
You will need:
6 cups of elbow pasta cooked
4 boneless chicken thighs (about 22 ounces) sliced in thin strips
½ of a medium sweet onion, finely diced
1 clove garlic, finely chopped
4 ounces mushrooms chopped (Cremini and White button)
1 teaspoon salt
½ cup cheese Six Cheese Italian Blend)
¼ teaspoon black pepper
2 tablespoons olive oil
5 tablespoons butter
4 tablespoons flour
8 ounces heavy cream
1½ cups chicken broth
1 handful of parsley finely chopped
1/3 cup of cheese for the topping
Begin with cooking the pasta as the directions suggest, as you will be requiring 6 cups of cooked pasta. By the time the pasta is cooked, the chicken and cream sauce will be ready. It’s so much easier when all ingredients are nice and hot so the baking time at the end will not be too long.
Prepare your ingredients before hand. So start by slicing 4 boneless chicken thighs into thin strips, then, finely dice ½ of a medium sweet onion. Finely chop 1 clove of garlic and roughly chop a mix of 4 ounces Cremini and white button mushrooms.
Chicken Strips, Onions, Garlic and Mushrooms
Heat a large skillet at medium high heat. Once the skillet is nice and hot, add 2 tablespoons olive oil and toss in the chicken strips evenly in the skillet. Let it brown for 3 minutes on one side, then toss again after 2 minutes. Add the finely diced onions and the chopped garlic and let soften for 3 minutes, tossing occasionally. Toss the chopped mushrooms in the skillet, then season the chicken mixture with 1 teaspoon salt and ¼ teaspoon black pepper and toss occasionally for another 3 minutes before transferring the mixture into a bowl.
Creamy Sauce
Using the same skillet, over medium high heat, melt 5 tablespoons butter. Once the butter is melted and slightly bubbling, add 4 tablespoons flour and using a whisk, stir the butter and flour mixture so that it doesn’t burn for 1½ minutes. Turn the burner down to medium low, then add 8 ounces heavy cream and 1½ cups chicken broth and simmer on medium low heat till bubbling for about 4 minutes. Add chicken mixture and pasta to the cream sauce and toss well, ensuring that the pasta is well incorporated in the sauce. Turn the heat off.
Chicken and Pasta Mixture with Parsley
 Take a handful of parsley and finely chop. Add to the chicken and pasta mixture as well as ½ cup six cheese Italian blend. Toss the mixture well, again.
Chicken and Pasta Mixture with six cheese Italian Blend
I used 4 individual ramekins. Fill each with 2 cups of the mixture. Or if you wish, you can use two large ramekins and 4 smaller ones if you have little children. Top the ramekins evenly with 1/3 cup of six cheese Italian blend.
Ramekin filled with Creamy Cheesy Chicken Pasta
Since the mixture is still hot, turn the oven on to broil, on high. Place the ramekins on the top rack and broil until the cheese is golden brown. This will vary with each oven, but it shouldn’t take more than 2 minutes if as much.
Ready to be Enjoyed!
This serves 4. Voilà. The whole family enjoyed this and I was told that the kids didn’t even mind the parsley, so I was quite happy.

Read more...

Broiled Pork Sirloin Cutlets with Sage Rub and Onions

These lean steaks are similar to sirloin chops, only meatier and boneless. It’s a cut from the sirloin end of the tenderloin. This type of cut is good for braising and grilling as well. For this recipe, use slightly thicker pieces, about ¾ to 1 inch thick, so when they are broiled, they remain juicy. Thin ones have a tendency to dry out quite fast.


Even though this is a lean cut, look for the pieces that have a bit of marbling in them. Marbling is when you see small streaks of fat within the muscle. It has a strong effect in maintaining the juiciness, flavor and tenderness of the meat.
Photography by Heaven on Hearth

The best way to marinate your meats is in a food-safe plastic bag, a stainless steel dish or a non-reactive container. A glass dish would be perfect.

To impart the flavors that I wanted to the meat, I used a wet rub. A rub is a mixture of herbs and spices that are pressed onto the surface of the meat. Rubs are commonly used on roasts and steaks and in Jamaica, we also use it to season stews before cooking it. A dry rub consists of herbs, spices and any other dry seasonings you wish to add, whereby a wet rub may have a small amount of liquid like oil, Worcestershire sauce, soya sauce, mustard, just to name a few, along with the dry rub.
A wet rub adds flavor and also seals in the juices of the meat because of the beautiful crust of seasonings that cover it. It will help the meat from drying out while cooking.
I chose sage as my herb because it has a rich, distinctive flavor and pairs perfectly for this simple pork dish. Albanian sage has a richer flavor than the California sage normally sold in supermarkets.
You will need:
1½ pounds pork sirloin cutlets
1 teaspoon salt
ground fresh pepper
2 teaspoons rubbed Albanian sage
2 cloves garlic, chopped
For this simple dish, simple seasoning works best.
As you all know, I like to season my meat a couple hours before cooking, even overnight, so that all the flavors have a chance to mingle together and penetrate into the meat. Because this particular cut of pork is not one of the best cuts of meat and quite lean I wanted to make sure that the meat is tenderized, that is why leaving the meat to rest for a bit longer will help. The meat will also be very flavorful and you won’t regret it. Do not overpower the meat with too much seasoning, as you still want to taste the meat, so the right amount of sage is imperative.
Pork Sirloin Cutlet Seasoned with Kosher Salt, Freshly Ground Pepper and Albanian Rubbed Sage
Place the cutlets in a glass dish. Season the cutlets with a mixture of 1 teaspoon salt, freshly ground pepper and 2 teaspoons rubbed Albanian sage on either side. Drizzle with 2 tablespoons olive oil add 2 cloves chopped garlic and rub the seasoning into the meat so that the cutlet is well coated with the wet rub. You can also mix all the ingredients into a wet paste and then rub on the meat, whatever is easier for you.
Slice 1 medium sweet onion in ¼ inch slices and place on the top of the meat. Make sure it’s well covered and always refrigerate, never allow to let the meat sit at room temperature.
Turn the cutlets occasionally so that they will absorb some of that onion flavor from the slices and the onions will also get the chance to be seasoned as well. Don’t worry if the slices do not stay intact with the occasional turning, you will still enjoy them.
Pork Sirloin Cutlets with Wet Rub and Sliced Sweet Onions
Take the meat out of the fridge about 30 to 60 minutes before cooking. Make sure it is nearly at room temperature. The reason for this is because you want the meat to be evenly cooked, so raising the internal temperature before cooking will ensure that.
Place the rack 8 inches below the broiler. Set the oven to low broil. Once heated, broil the cutlets for 10 minutes. Turn the cutlets with a pair of tongs or a spatula, as using a fork will rob the cutlet of its juices. Once the cutlets have been turned, set the oven on hi broil for another 10 minutes. Turn the cutlets again, leaving the oven on hi broil and add the onions around the cutlets for 5 more minutes.
Just as a rule of thumb, the internal temperature of the pork should be anywhere between 145° to 160° Fahrenheit. Also remember that all ovens work differently, so it is good to check the cutlets every now and then.
Ready to be Enjoyed!
>This serves for 4. Voilà. Bon Appétit! This can be served with Parsley Potatoes, a tossed green salad with vinaigrette and glass of Chardonnay. Enjoy!

Read more...
Protected by Copyscape Online Infringement Detector
MyFreeCopyright.com Registered & Protected

  © Blogger template Shush by Ourblogtemplates.com 2009

Back to TOP